
Disclosure: This article contains affiliate links. If you buy through them, I may earn a small commission at no extra cost to you. I only recommend gear I’d put in my own rigs. Prices and availability change — confirm current specs before you buy. This is a tuning guide, not a warranty document — undervolting and power-limiting are reversible and widely used, but you make changes at your own risk.
This is the first thing you should do to a high-power AI workstation, and it costs nothing. Before you buy a better cooler, swap your case, or rearrange fans, you can cut your GPU’s heat output and noise substantially — usually with little or no loss in tokens per second — just by telling it to stop chasing performance it doesn’t need.
That last part is the key, and it’s the part that makes this work so much better for inference than for gaming. Let me explain why, then walk you through doing it safely, starting with the easy method that can’t break anything.
This guide is part of the series anchored by How to Reduce Heat and Noise in a High-Power AI Workstation — the pillar that lays out all five levers. This is lever one, and it’s the highest-impact one.
Undervolt for inference:
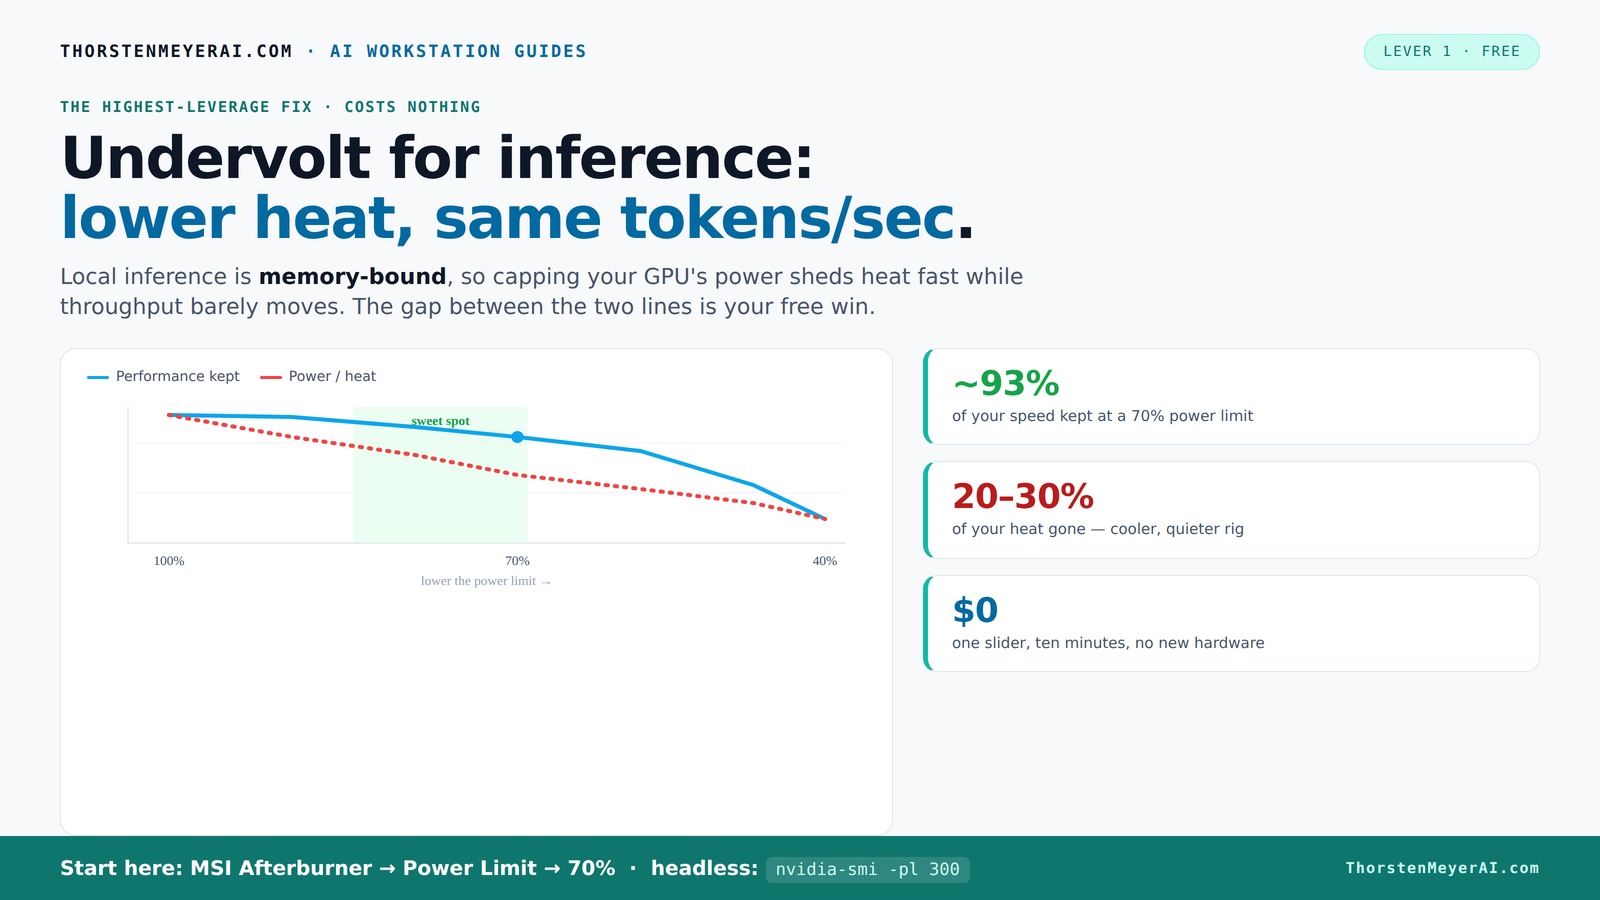
lower heat, same tokens/sec.
Local inference is memory-bound — the GPU core spends much of its time waiting on VRAM, not maxing out compute. So when you cap its power, heat falls fast while throughput barely moves. Drag the slider in Part 2 to see the trade for yourself.
(the real limit)
(often waiting)
you pay for in heat
| Power limit | Power draw | Temp | Speed kept | Efficiency |
|---|---|---|---|---|
| 100% (stock) | 390 W | 72°C | 100% | baseline |
| 80% | 330 W | 70°C | 98.6% | +17% |
| 70%recommended | 300 W | 67°C | 93.4% | +22% |
| 60% | 260 W | 62°C | 91.5% | +37% |
| 55%peak efficiency | 240 W | 60°C | 89.2% | +45% |
| 50% | 220 W | 58°C | 82.6% | +46% |
| 40% (too far) | 180 W | 52°C | 61.3% | falls off |
- One slider, 100% → 70%. The card reduces voltage and clocks on its own.
- Can’t damage anything — you’re restricting the card, not pushing it.
- No stability testing needed.
- Captures most of the available benefit.
- Edit the voltage-frequency curve — hold a clock at lower voltage.
- Target around 0.9–0.95V to start; better chips go lower.
- Keeps more performance for the same heat cut.
- Test under your real workload — a curve stable for 10 min can fail on hour 3.
MSI Afterburner (works on any brand). Headless Linux: nvidia-smi or LACT.sudo nvidia-smi -pl 300.Why this works so well for inference specifically
Modern GPUs ship tuned for one thing: the highest benchmark number the chip can hit. NVIDIA has to guarantee that every card it sells — including the weakest chip in the batch — is stable at its rated clocks, so the factory voltage curve is set conservatively high, with extra voltage baked in as a safety margin. That last slice of voltage produces a disproportionate amount of heat for a tiny sliver of performance. You're paying for it in watts, temperature, and fan noise whether you need it or not.
Here's the inference-specific insight. Most local LLM work is memory-bandwidth-bound, not compute-bound — the GPU spends much of its time waiting on data moving in and out of VRAM, not maxing out its compute cores. When the bottleneck is memory bandwidth, the core doesn't need to run at its absolute peak clock to keep up. So when you cap the power and the core backs off slightly, your tokens per second barely move — because the core wasn't the limiting factor in the first place.
Gaming is different. A game often is compute-bound, so backing off the core costs you frames. That's why generic undervolting guides written for gamers are cautious about performance loss — and why for inference you can be more aggressive and lose almost nothing. The bottleneck is somewhere else.
The result: on inference and training workloads, you can pull a lot of heat and noise out of the system for a barely-measurable speed cost. The data backs this up, and we'll look at it in a second.

XOOL 200 in 1 Precision Screwdriver Kit, Electronics Repair Tool Magnetic Driver Kit with 164 Bits, Flexible Shaft, Extension Rod for Computer, iPhone, Laptop, PC, PS4, Xbox, Nintendo
- Comprehensive 200-in-1 Kit: Includes screwdriver handles, bits, tools, and accessories
- Versatile Repair Compatibility: Suitable for phones, laptops, gaming consoles, and more
- High-Quality CR-V Steel Bits: Durable, hardened bits with HRC62+ hardness
As an affiliate, we earn on qualifying purchases.
As an affiliate, we earn on qualifying purchases.
Two methods: the easy one and the precise one
There are two ways to do this, and the distinction matters because one is genuinely foolproof and the other takes patience.
Power limiting is the easy method. You move a single slider — "power limit" — from 100% down to, say, 70%, and the GPU does the rest: it intelligently reduces voltage and clocks to stay under that power ceiling. It is reversible, it cannot damage anything (you're restricting the card, not pushing it), and it requires no testing for stability. This is where everyone should start, and for most people running inference, it's all you need.
Undervolting is the precise method. You edit the GPU's voltage-frequency (V-F) curve directly, telling it to run a specific clock at a lower voltage than the factory curve uses. Done well, undervolting can beat power limiting — you keep more performance for the same heat reduction — but it requires editing a curve, testing for stability, and re-testing under your actual workload. It's worth it if you want to squeeze out the last bit, but it is not where a beginner should start.
My honest recommendation for most readers: start with power limiting, and only graduate to undervolting if you want to optimize further. The easy method captures most of the benefit. The numbers below show why.

Latest AMD Ryzen AI 9 HX 470 Mini PC, 12C/24T Up to 5.2GHz,Feature Crucial 48GB DDR5 1TB SSD, Radeon 890M GPU, 8K Quad Display, USB 4.0 Oculink, WiFi 7, BT 5.4 RDNA 3 NPU 86TOPS AI Gaming Mini PC
- Latest AMD Ryzen AI 9 HX 470: 12 cores, 24 threads, up to 5.2GHz
- AI NPU with XDNA 2 Architecture: 55 TOPS AI processing power
- 48GB DDR5 RAM, Upgradable to 96GB: High-speed memory for multitasking
As an affiliate, we earn on qualifying purchases.
As an affiliate, we earn on qualifying purchases.
The data: what you actually give up
This is the part most guides hand-wave. Here's real measured data so you can decide where to set your own limit.
On an RTX 4090 running a sustained fine-tuning workload (full GPU load, exactly the kind of sustained job an AI workstation does), one developer measured performance and power across the full range of the power slider:
| Power limit | Power draw | Temp | Performance kept | Efficiency (work per watt) |
|---|---|---|---|---|
| 100% | 390 W | 72°C | 100% | baseline |
| 80% | 330 W | 70°C | 98.6% | +17% |
| 70% | 300 W | 67°C | 93.4% | +22% |
| 60% | 260 W | 62°C | 91.5% | +37% |
| 55% | 240 W | 60°C | 89.2% | +45% |
| 50% | 220 W | 58°C | 82.6% | +46% |
| 40% | 180 W | 52°C | 61.3% | (falls off) |
Look at the 70% row. You drop from 390W to 300W — 90 watts of heat gone, a 5°C drop — and you keep 93% of your speed. At 60% you're down to 260W (a third less heat, 10°C cooler) and still keeping over 90%. The efficiency sweet spot — the most work per watt of electricity and per degree of heat — sits around 50-55% power. Only below 40% does performance fall off a cliff, because at that point you've finally starved the core enough to make it the bottleneck.
The flagship RTX 5090 (575W TDP) behaves the same way, just at higher absolute numbers: capping it to 450W costs around 5% performance on average, and 400W costs roughly 10%. Independent testing on its predecessor found a 300W cap (down from 450W) kept 97.8% of performance in real workloads — "most folks are not going to notice what is only a 2% difference," as one outlet put it.
The takeaway: a power limit somewhere between 60% and 80% is the high-value zone for an inference rig. You give up low single digits to mid single digits in tokens per second, and in exchange you get a dramatically cooler, quieter, more efficient machine that stops heating your office. For a card that runs all day, that's the best trade in this entire series.
Noctua NF-P12 redux-1700 PWM, High Performance Cooling Fan, 4-Pin, 1700 RPM (120mm, Grey)
- Size: 120x120x25 mm
- Voltage: 12V
- PWM Control: 4-pin PWM
As an affiliate, we earn on qualifying purchases.
As an affiliate, we earn on qualifying purchases.
How to power-limit your GPU (the easy method)
On Windows
You'll use MSI Afterburner (free, works on any brand of card, not just MSI). It's the standard tool and the one most guides assume.
- Download and install MSI Afterburner, then open it.
- Find the Power Limit slider (labeled "Power Limit (%)").
- Drag it down to 70% to start. (If your card lets the power and temperature limits move together, that's fine — leave the temp limit at default.)
- Click the checkmark / apply button.
- Click the Windows icon to save it as a profile, and enable "apply at startup" so it persists across reboots.
That's it. Run your normal inference workload, watch your temperatures drop, and listen to the fans calm down. If you want to push further, try 60%, run your workload, and see whether the tokens-per-second drop is acceptable for you. There's no stability testing needed — the card simply runs cooler.
On Linux (including headless rigs)
If your workstation runs headless — which a lot of dedicated inference boxes do, sitting in a closet and accessed remotely — you don't need a GUI at all. NVIDIA's own command-line tool handles power limiting:
- Check your card's power range:
nvidia-smi -q -d POWERLook for the min and max enforced power limits. - Set a power cap (example: 300W):
sudo nvidia-smi -pl 300 - To make it persist across reboots, add that command to a systemd service or your startup scripts (the setting resets on reboot otherwise).
For more control on Linux — including actual undervolting on supported cards — the community tool LACT gives you a clean GUI for power limits, clock offsets, and fan curves, and it works well on headless setups over a remote connection.

Thermal Paste CPU 1.8g with Toolkit for CPU GPU IC and Heatsinks
- Safety Application: Metal-free and non-conductive formula
- Superior Thermal Conductivity: Made of carbon microparticles for fast heat dissipation
- High Durability: Stable performance for demanding systems
As an affiliate, we earn on qualifying purchases.
As an affiliate, we earn on qualifying purchases.
How to undervolt (the precise method)
If you've power-limited and want to optimize further, undervolting via the V-F curve is the next step. The principle: instead of capping power and letting the card figure out the voltage, you explicitly tell it to run a given clock at a lower voltage. Here's the standard approach in MSI Afterburner.
- Note your card's stock behavior first — run your inference workload and record the clock speed it holds and the voltage it uses. This is your baseline.
- Open the Curve Editor (Ctrl+F).
- Pick a target voltage point — for current high-end cards, somewhere around 0.9-0.95V is a common starting point (the exact value is card-specific; better chips go lower). Find that voltage on the X-axis.
- Drag that point up to the clock speed you want to hold (start near your stock boost clock), then flatten the curve to the right of that point (select everything past it and press Enter, or Shift+Enter to flatten). This tells the card: "run this clock at this voltage, and don't go any higher in voltage no matter what."
- Apply, then test for stability under your real workload — run a long inference or training job, not just a quick benchmark. If it crashes or produces errors, raise the voltage slightly (or lower the target clock) and retest.
- Once stable, save it as a startup profile.
The goal isn't the lowest voltage the card can boot at — it's a stable "95% of stock performance at meaningfully lower voltage" setting that holds up under hours of continuous load. Undervolting is more finicky than power limiting precisely because you're hunting for that stable point, and a curve that's stable for ten minutes can still fail on hour three of a long job. Test accordingly.
One caution specific to the 50-series: the "unplug a power cable to force a lower limit" trick that circulated for the 5090 is not a substitute for proper power limiting — it's a blunt hardware hack that doesn't work on smaller cards (the 5080 simply fails to boot on fewer cables) and gives you no fine control. Use the software slider.
How to know it's working
Don't trust your ears alone — measure. Before and after each change, check four things: GPU temperature, the clock speed it holds under load (to confirm it isn't throttling for the wrong reason), power draw, and your actual tokens per second on a real model. A change that drops your temperature but quietly tanks your throughput isn't a win, and you'll only catch it if you watch the numbers. The monitoring tools I use — and how to read them — are in Temperature and Noise Monitoring Tools for Workstations.
A good before-and-after looks like this: same tokens per second (within a percent or two), GPU temperature down 5-10°C, power draw down 20-30%, and fans noticeably quieter because they have less heat to move. If you got that, you're done — and you did it for free.
Where this fits in the bigger picture
Undervolting and power-limiting reduce the heat at the source, which is why it's lever one — every watt you don't produce is a watt you don't have to cool or move out of the case. But it's the first step, not the only one. Once your GPU is running cooler and drawing less, the next levers are about moving the remaining heat efficiently and quietly:
- A cooler matched to the (now lower) sustained load — see Best Quiet CPU Coolers for Sustained AI/Compute Loads and Liquid vs Air Cooling for 24/7 Inference Rigs.
- Case airflow that lets the heat actually leave — Best Quiet Case Fans + the Airflow Setup That Actually Works.
- Fan-curve and dampening tuning for the last of the noise — Acoustic Dampening, Placement, and the "Rig in the Closet" Setup.
And if you're choosing a GPU partly because of how it handles sustained thermals — workstation cards versus oversized gaming cards — that's its own decision: Quiet GPUs for Local AI: Acoustic and Thermal Roundup.
The bottom line
Power-limiting your GPU is the single highest-leverage, lowest-effort, zero-cost change you can make to an AI workstation. Because local inference is memory-bound, capping power to 60-80% sheds 20-30% of your heat and a big chunk of your fan noise while costing you only low-single-digit to mid-single-digit tokens per second. Start with the power-limit slider — it's foolproof — and only move to curve undervolting if you want to optimize the last few percent.
Do this first. Then, if the rig is still warmer or louder than you want, work down the rest of the levers in the pillar guide. But you may be surprised how much of the problem disappears in the ten minutes it takes to move one slider.
Tools mentioned: MSI Afterburner (free), NVIDIA nvidia-smi (included with drivers), LACT (free, Linux). Performance figures from published RTX 4090 fine-tuning measurements and RTX 5090/4090 power-scaling tests, 2025-2026; your results will vary by card, model, and workload.